Close Work Tickets in Sage 50

How do you close work tickets in Sage 50?

What are work tickets in Sage 50 closed for? When a work ticket is closed, an assembly build record is automatically created behind the scenes. Because the assembly build record is automatically created, you won’t have to build the assembly in the Build/Unbuild Assemblies window. To close a work ticket, follow the steps below.

  1. From the Tasks menu, select Work Tickets. The Work Tickets window appears.
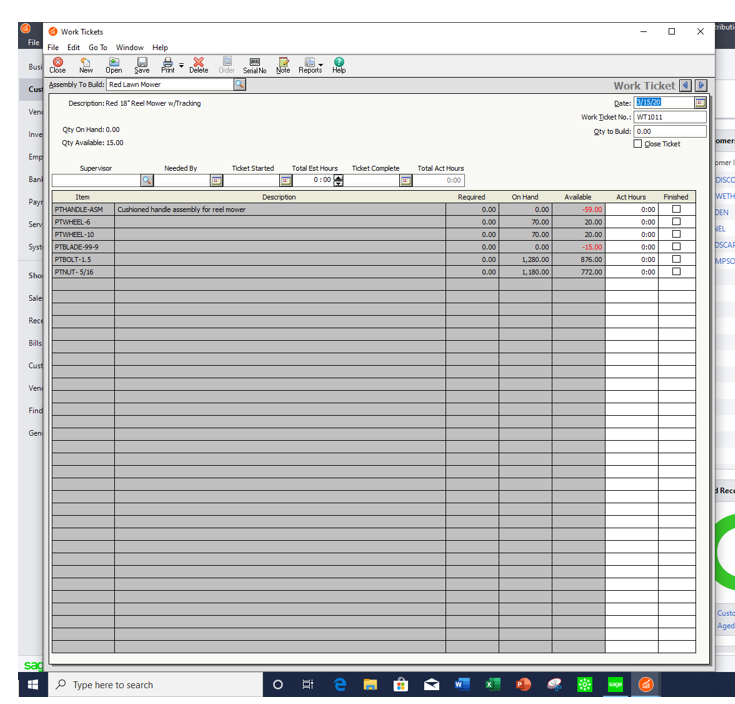
  2. Click the Open button and select the number of the ticket that you want to close and click OK. The selected work ticket information appears in the Work Ticket window.
  3. To complete and close this work ticket, Enter or select 2/17/20  in the Ticket Completed box then select the Close Ticket checkbox. This selection will automatically complete and close the work ticket after, the ticket will be given a status of Closed.       
  4. After you have finished, select SaveWhen you save a closed work ticket, an assembly build record is automatically created behind the scenes. 

If you would like to learn more about how to close work tickets in Sage 50 and Sage 50cloud, Accounting Business Solutions by JCS offers a Sage 50 Manufacturing/Sage 50cloud Manufacturing training class. For Sage 50 support and training, call us today at 800-475-1047 or email us at solutions@jcscomputer.com.

Print Work Tickets in Sage 50 and Sage 50cloud

How do you print work tickets in Sage 50? What are work tickets in Sage 50 used for?

Work tickets can be printed and used in various ways. Printed work tickets may be used in your Inventory department to gather the materials needed to build an assembly. Likewise, copies of closed work tickets may be sent along with the necessary materials to authorize the shop to build an assembly.

In Sage 50, you can print work tickets in two ways:

  1. By clicking the Print button in the Work Tickets window
  2. By selecting Work Tickets from the Inventory Report List in the Select a Report window

If you are interested in printing just one work ticket and you already have the Work Tickets window open, print the ticket by selecting the Print button. However, if you are interested in printing a number of work tickets, print the work tickets from the Inventory Report List in the Select a Report window. Use the following procedure to print work tickets in the Select a Report window.

If you would like to learn more about how to print work tickets in Sage 50 and Sage 50cloud, Accounting Business Solutions by JCS offers a Sage 50 Manufacturing/Sage 50cloud Manufacturing training class. For Sage 50 support and training, call us today at 800-475-1047 or email us at solutions@jcscomputer.com.

Sage 50 Bill of Materials for inventory management of Sage 50

Sage 50 Bill of Materials Revisions

Bill of Materials Revisions in Sage 50

Revisions allow you to make changes to the bill of materials for assembly items that have been used in transactions. You can access the Revisions window by selecting the Revisions button, which is located on the Bill of Material tab of the Maintain Inventory Items window. The Revisions window lists all revisions that have been made to the bill of materials and the effective date for the revision. From this window, you can either create a new or edit an existing revision. The original bill of materials is always listed as Revision 0 and cannot be deleted.

Sage 50 Bill of Materials for inventory management of Sage 50

Updates

Bill of Material – Revisions are valuable because they update the bill of materials without altering the original bill of materials. Any item built before the new revision date will be associated with the current assembly build. Revisions allow you to make slight changes to the bill of materials without requiring you to create a new Sage 50 inventory assembly.

Although you can use them in a number of ways, revisions are only intended to be used to make minor changes to the bill of materials. To help clarify what constitutes a minor change and to further explain when to use a revision as opposed to another assembly item, consider the following examples:

Sage 50 Bill of Material – Revision vs New

  • When to create a revision: You produce large quantities of an item and occasionally the options for that item change mid-stream. Let’s say that the screw that you are using for the item is no longer available or you want to use a different screw.  By replacing this component only in the bill of materials, you create a revision. This allows you to produce an assembly item that may differ slightly, but is treated identically for inventory purposes.
  • When to create a new assembly item: You produce large quantities of an item and occasionally the options for the item change mid-stream. Let’s say that one of the components for the item has tripled in price.In this case, we recommend that you create a new assembly item instead of a revision. You should create a new assembly item when costs greatly increase or components change significantly.

Changes to the bill of materials are entered on either the Create a New Revision or on the Edit an Existing Revision window. This is dependant upon whether you selected the New or Edit button in the Revisions window.

Modifications

In this window, you can add and delete items, move items up or down on the component list. In addition, you cab change the quantity required. While you have a great deal of flexibility in what you can change. However, it is important to remember that revisions should only be used to make minor changes to the bill of materials.

When entering a revision, a ‘revision number’ is assigned to the revision and will be listed in the window. For reports that list the bill of materials, the corresponding revision number will also be listed on the report.This will help you keep track of which items should be included in the bill of materials.

Two other very important parts of a revision are the Effective Date and the Note. The effective date is important because it determines when a revision will be used by Sage 50 to build or un-build assemblies. Likewise, a note helps you identify the purpose of a revision. If a note is not entered, Sage 50 will automatically insert a generic note. This note includes the date, time, and the Sage 50 user who entered the revision.

To learn more about Bill-of-Material Revisions in Sage 50 and Sage 100, Accounting Business Solutions by JCS offers training classes. Both a Sage 50 Manufacturing and Sage 50 Inventory Management training classes. For Sage 50 support and training, call us today at 800-475-1047 or visit us www.jcscomputer.com.

Quantity Discounts in Sage 50

How do you use Quantity Discounts in Sage 50? What are Quantity Discounts in Sage 50 used for?

The Maintain Quantity Discounts window allows you to set up discounts for items based upon the quantity sold. You can set up your inventory so that when a customer purchases a specified amount of an item, its sales price is discounted by a percentage or a set amount. For example, you could give customers a 10% discount if they purchase 50 or more of a certain inventory item.

When you set up a quantity discount, you can specify up to five different quantity ranges and corresponding discounts. For example, you could create a quantity discount that gives a 5% discount if 25 or more widgets are purchased, 10% if 50 or more widgets are purchased, 20% if 100 or more widgets are purchased (and so forth), until you’ve created as many quantity discounts as you need. You can create a unique quantity discount ID for each item in your inventory, or create one quantity discount and apply it to whichever inventory items you choose. For example, you could create a discount for a seasonal sale and apply the discount to your seasonal inventory items. You could also create a separate discount specifically for lawn mowers. Quantity discounts are available for stock, master stock, non-stock, service, labor, and assembly item classes.

After you set up the quantity discounts and apply them to inventory items, the sales prices will be automatically discounted on quotes, sales orders, sales invoices, receipts, credit memos (Apply to Sales tab), memorized quotes, and memorized invoices.

Note:Quantity discounts are calculated separately for each line of a transaction. If you create a quantity discount where purchasing 40 widgets discounts the widgets by 5%, all 40 widgets must be entered on the same line in order for the discount to be calculated.

When you sell items in multi-pack units, Peachtree checks to see whether the number of units in the multi-pack meets the criteria for a quantity discount. For example, if you create a quantity discount where selling six items gives customers a discount, selling one six-pack of the item (a multi-pack unit that you created) would be treated the same as six individual units. The customer will receive the quantity discount.

If you would like to learn more about Quantity Discounts in Sage 50 and Sage 50cloud, Accounting Business Solutions by JCS offers a Sage 50 Manufacturing/Sage 50cloud Manufacturing training class. For Sage 50 support and training, call us today at 800-475-1047 or email us at solutions@jcscomputer.com.

sage 50 bank reconciliation

How to Run an Audit Trail Report in Sage 50

What is an Audit Trail Report in Sage 50?


The Audit Trail Report is a useful report which helps users locate and correct Sage 50 errors by offering them a detailed chronological listing of all changes made in their Sage 50 company file. Sage 50 audit trail support, training and consulting for Sage 50. Give us a call for promotional offers!

Sage 50 accounts audit trail report – The audit trail feature logs when a person enters data, maintains (edits) existing data, and removes data. This useful report shows the date and time of the modifications, as well as the user who made them. The Sage 50 Audit Trail offers unique customizable columns and can assist you in pinpointing Sage 50 data errors.

Month End Close Checklist for Sage 50


How do you run an Audit Trail Report in Sage 50?

To run an Audit Trail Report, follow these simple steps after you have logged into Sage Accounting with appropriate security rights:

  1. Select Reports & Forms

How do I run an audit report in Sage 50, How do I get to the audit report in Sage 50, Does Sage 50 have an audit trail, How do you get to the audit trail in Sage, audit trail report sage, audit trail report sample,


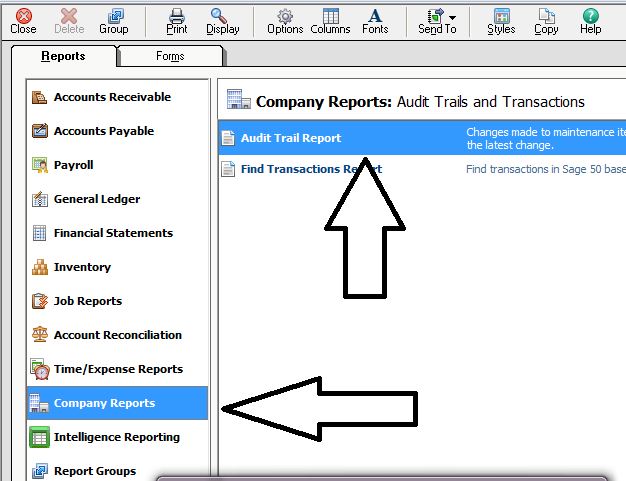
2. Select Company, then select Reports

audit trail, Sage 50 audit trail, How do I run an audit report in Sage 50, How do I get to the audit report in Sage 50, Does Sage 50 have an audit trail, How do you get to the audit trail in Sage, audit trail report sage, audit trail report sample,


3. Select Audit Trail Report

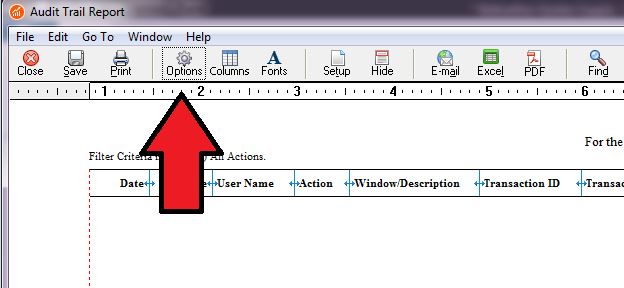
4. When the report opens, it defaults to today’s activity.  Click Options (Gear icon) to select your specific date range.

Sage 50 audit trail, Sage peachtree audit trail, sage 50 peachtree audit trail, audit trail, Sage 50 audit trail, How do I run an audit report in Sage 50, How do I get to the audit report in Sage 50, Does Sage 50 have an audit trail, How do you get to the audit trail in Sage, audit trail report sage, audit trail report sample,


Users ask How do I get to the audit report in Sage 50 – If you need technical assistance give us a call

When you are ready to run the report look for the options Icon. This allows the user to set a date range and choose between sorting by date/time or by user name. In addition, you can filter the report by action (All, Add, Change, Delete), transaction reference, or user name.
If you want to sort or filter the report in a way that isn’t offered in the options you can send the report to Excel where you can sort or filter on any column.


Sage 50 Support Services:

Are you having trouble with your Sage 50 or Sage 50c software? The certified Sage consultants at Accounting Business Solutions by JCS offer Sage 50 training, support, and data repair. Our experienced Sage 50 experts can help get rid of your Sage 50 error  messages, including those which can be fixed with the Sage 50 Audit Trail Report. To get started with a Sage 50 consultant today, call us at 800-475-1047 today or email us at solutions@jcscomputer.com.


Sage Software Sage 100 Month End Checklist, Sage 50 month end checklist, Sage 100 support, Sage 50 support

Sage 50 / Sage 100 Month-End Checklist for Sage Software

Sage 50 month end Checklist or Sage 100 month end checklist

One of the main benefits of using an accounting or an ERP system is the organizational advantages offered by these products. Whether you are using Sage 100 ERP or Sage 50 software, it is crucial to keep your monthly finances accurate and up-to-date. Never fall behind with our handy Sage 50 / Sage 100 Month-End Checklist!

Sage 50 / Sage 100 Month-End starter Checklist: Get the full version of  month end checklist here

  • Enter your sales and purchase invoices for the month.
  • Enter all monthly payments and receipts from check stubs and paying-in slips.
  • Enter direct debits, ACH transfers, checks, and so on from your monthly bank statements.
  • Reconcile bank accounts for the month, including credit cards.
  • Enter journals or run wizards for accruals, prepayments, depreciation and so on.
  • Depending on where you live and your payment schedule, calculate, file, and pay your monthly state and federal employment and sales taxes.
  • Run Aged Debtors and Aged Creditors reports for the period.
  • Run Profit and Loss and Balance Sheet for the period.
  • Run month-end wizard (Tools→Period-End→Month-End).


Sage 100 Month End Checklist, Sage 100, Sage 50, Sage 50 Month End Checklist, Sage 100 support, Sage 50 support, sage software

Sage Software certified consultant

If you need help learning how to use these helpful Sage 50 / Sage 100 month-end features, call the certified Sage consultants at Accounting Business Solutions by JCS today! Our experienced, professional staff offers a full range of Sage software consulting services, including Sage 100 support, Sage 100 classes, Sage 100 data repair, Sage 50 support, Sage 50 classes, and Sage 50 data repair for all years and versions of your particular Sage product. Our nine locations, which include Detroit, MI, Chicago, IL, Charleston, SC, St. Louis, MO, Mandeville, LA, Dallas, TX, Naples, FL, Atlanta, GA, and Sacramento, CA, are conveniently located throughout the United States to serve you better. We also offer remote assistance and in-house help. Get help with your Sage 100 or Sage 50 software by calling 800-475-1047 today, by emailing us at solutions@jcscomputer.com, or by filling out our contact form. Your success is our goal! get your month end checklist here

sage 50 bank reconciliation

How do I perform a bank reconciliation in Sage 50?

A bank reconciliation is used to ensure that the transactions you have entered into your Sage 50 software match up with the transactions on your bank statement. Prior to performing a bank reconciliation in Sage 50make sure that all of your sales invoices, checks, supplier invoices, recurring charges, and receipts have been posted for the time period you are trying to reconcile. Checking this prior to actually performing the bank reconciliation in Sage 50 will save you the headache of trying to find any variance you may encounter when the reconciliation is completed.

  1. From the Sage 50 Bank Accounts module, select which account you want to reconcile by clicking on the “Reconcile” icon. You will then see the Statement Summary window, where you will need to enter the following:
    • A title for the bank reconciliation
    • The bank statement balance you are reconciling to
    • The date of the statement
  2. After clicking “OK”, the bank reconciliation screen will open and you’ll be able to use your bank statements to tick off all the transactions that are currently showing in Sage 50 against the bank statements themselves. If any items have not been selected, such as direct debits or  receipts, add them by using the adjustment button and selecting the appropriate type of payment or receipt.
  3. When you are able to match all of the items in Sage 50 with an entry on your bank statement, double check that the “Difference” box in the bottom right hand corner is zero. If the variance is anything other than zero, the first thing you should check is that you have entered the correct bank statement amount.  If those numbers are correct, you’ll have to compare the bank statement to the items you have checked off on the Sage 50 reconciliation screen.
    • Common errors include double entry of a particular transaction, accidentally selecting a transaction which is out of that particular date range, or even a transposed amount somewhere within your Sage 50 transactions.
    • One way you can quickly find errors is to compare the bank statement to the Sage 50 reconciliation screen from the most recent transaction to the oldest transaction (so backwards).
  4. If you are confident that your figures are correct and the “Difference” box in the bottom right hand side of your screen is zero, press “Reconcile.”
    • Sage 50 automatically saves a copy of your bank reconciliation in the archives if you need to revisit it at a later date.


For more Sage 50 training or to learn more about performing a bank reconciliation in Sage 50 accounting software, visit Accounting Business Solutions by JCS or call us today at 800-475-1047!

New in Sage 50 and Sage 50c – U.S. 2018.1 – 800-475-1047 – Support – Training – Consultant – Reseller

New in Sage 50 and Sage 50c – U.S. 2018.1 – 800-475-1047 – Support – Training – Consultant – Reseller

The new features provide flexibility to keep your office connected to the cloud! Features include:

  • New Cloud & Mobile Navigation Center
  • New Sage Bank Feeds Auto-Reconciliation Features
  • Improvements to Sage Contact
  • New Sage Dashboard Office 365 app

Cloud and Mobile Navigation Center

The Cloud and Mobile Navigation Center connects services via the cloud and allows for remote company data sharing. Accessible from the file menu, Office 365, Sage Drive and Sage One are all integrated. Beginning with the release of Sage 50c, the Cloud and Mobile navigation center are included. Your data is securely shared through the cloud without compromising data security. There are many features included with this new navigation center.

Sage Bank Feeds – Auto-Reconciliation Feature

Sage now offers the ability to link your bank account to sync bank and credit card transactions in order to streamline the process of reconciling these accounts. This feature helps eliminate errors with manual data entry while promoting accuracy to match transactions processed by your bank or credit card. The setup is easy through the account reconciliation window. Capture up to 2 years of historical bank records. Once the bank feeds are downloaded, Sage 50c will automatically match the transactions previously recorded to clear.

Sage Contact Improvements

Again, this feature is integrated with Microsoft Office 365 to allow you to view the detailed information about Sage 50c customer and vendor contacts in the Office 365 Mail app and desktop version of Outlook. There is a comms tab that provides the view of previous communication with vendors/customers to easily review history of communications and there is a notes tab to track communications and share notes with other users.

Sage Dashboard – Office 365 App

This is a new application offered in Sage 50/50c that integrates with Microsoft 365 that will allow you to view Revenue-Expense information, Aged Payables and Aged Receivables directly in Office 365. As long as you have access to the web, you will be able to view these features through a series of interactive charts and graphs. This feature provides you the ability to view critical data anywhere, anytime. The app will sync automatically. Examples of these features include Overdue Sales by Period shown on a bar graph for the last 12 months with the ability to drill down on a particular month. An Accounts Aging Pie chart is also available displaying the largest and oldest accounts as the larger pieces of the pie and the smaller piece listed as other with the remaining past due customer accounts. The pie chart can also be drilled down on by selecting a customer. On the Payables tab, the bar graph will display Overdue Purchases by Period and the Pie chart displays Accounts Over 90 days past due. The final tab is Revenue and Expenses displayed for the past 12 months in bar graphs.

For more information on Sage 50 and Sage 50c, give one of our professional consultants a call 800-475-1047 www.jcscomputer.com

With over 25 years of accounting and business knowledge as well as proficient technical background you get the training and support your business needs and deserves working with a proficient expert consultant.   You can work with the same consultant to help you master your Sage Software and for those occasional questions you need help with so you can understand best practices and how to manage your company information and books.

Put our 25 years of experience to work for you!

“Your Success is Our Goal”

www.jcscomputer.com          800-475-1047          solutions@jcscomputer.com

Like us on Facebook  and follow us on Twitter

Alabama Alaska Arizona Arkansas California Colorado Connecticut Delaware Florida Georgia Hawaii Idaho Illinois Indiana Iowa Kansas Kentucky Louisiana Maine Maryland Massachusetts Michigan Minnesota Mississippi Missouri Montana Nebraska Nevada New Hampshire New Jersey New Mexico New York North Carolina North Dakota Ohio Oklahoma Oregon Pennsylvania Rhode Island South Carolina South Dakota Tennessee Texas Utah Vermont Virginia Washington West Virginia Wisconsin Wyoming
2018.0 – Sage 50c Exclusive Office 365 Release Features – 800-475-1047 – Training – Support – Consultant – Reseller

2018.0 – Sage 50c Exclusive Office 365 Release Features – 800-475-1047 – Training – Support – Consultant – Reseller

Sage Intelligence Reporting with Office 365:

SI Reporting reveals the power of Sage 50c data into Excel. Customize and build powerful report using simple drag and drop design. Now with the ability to publish financial reports to the cloud and access them on your device to provide a deeper understanding to your business insights.

Sage Capture with Office 365:

Capture a receipt or record a transaction then post it to Sage 50c using any mobile device or tablet. Images are stored automatically in OneDrive so you won’t lost a document or receipt again. The Sage Capture App can be downloaded for free from the Apple and Android App stores!

With over 25 years of accounting and business knowledge as well as proficient technical background you get the training and support your business needs and deserves working with a proficient expert consultant.   You can work with the same consultant to help you master your Sage Software and for those occasional questions you need help with so you can understand best practices and how to manage your company information and books.

Put our 25 years of experience to work for you!

“Your Success is Our Goal”

www.jcscomputer.com          800-475-1047          solutions@jcscomputer.com

Like us on Facebook  and follow us on Twitter

Alabama Alaska Arizona Arkansas California Colorado Connecticut Delaware Florida Georgia Hawaii Idaho Illinois Indiana Iowa Kansas Kentucky Louisiana Maine Maryland Massachusetts Michigan Minnesota Mississippi Missouri Montana Nebraska Nevada New Hampshire New Jersey New Mexico New York North Carolina North Dakota Ohio Oklahoma Oregon Pennsylvania Rhode Island South Carolina South Dakota Tennessee Texas Utah Vermont Virginia Washington West Virginia Wisconsin Wyoming

X