Sage 100Cloud Dashboard New Data Visualization

Sage 100Cloud Dashboard


New Data Visualization

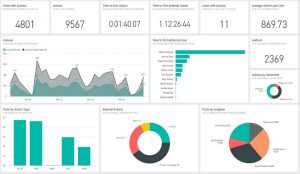
Are you looking for new ways to slice, dice and visualize data and to share your discoveries for your Sage 100Cloud with your business team? Discover Sage 100Cloud Dashboard because Microsoft Power BI is a powerful tool and we can help you get where you want to. This new collection of tools and features from Microsoft transforms your company’s data into rich visuals for you to collect and organize, so you can spot trends, collaborate in new ways, and make sense of your data by using Sage Intelligence with Microsoft Power BI.

All business need comprehensive data analytics solutions to gain insights into business operations and financial performance. It is an importance for your business to be able to review this data and have an analysis process with analytics charts and reports including this data giving knowledge and measurable KPI’s. These are the primary data tables you need to understand in Sage 100 Accounting Software and we can help you discover them or design and create the dashboards for you.

  • Master lists
  • Data entry
  • History
  • Work tables

Accounting Business Solutions by JCS’s Microsoft Power BI Consulting Services our team wants to be part of your team so we can grow together and we are a perfect match to help you with your data visualization needs using Sage 100cloud dashboard. We can help you quickly view your complicated and piles of data and get the information you need to make business decisions. Once created these types of dashboards can present data very quickly and provide you a complete view of your information in an easily understandable format using an interactive data visualization tool. Specializing in Sage 100, Sage Intelligence and Microsoft Power BI services.

Sage 100Cloud Dashboard – Providing Sage 100Cloud support, Sage Intelligence consulting services and Mircosoft Power BI design and implementation. Give us a call 800-475-1047 or email at solutions@jcscomputer.com
 

Sage 100 Sage Intelligence Microsoft Power bi support consultant training

For Sage Intelligence Questions and Answers

Where to access File Layouts information (field and table schema) or the TRSG (Technical Reference and Support Guide) for Sage 100 ERP.

Versions 2018 and later

From the Sage 100 ERP Desktop, click Web Content in the bottom left-hand corner

In the Web Content Navigation Task pane that appears, click Resources

Under Program Information, click File Layouts and Program Information

In the File Layouts and Program Information window that appears, select any of the help topics, which are listed below.

Program Listings

File and Table Listings

File Layouts (Open this to see file layouts organized by module and table name)

Object Hierarchy Listings

Data Class Definitions Listing

File Names and Key Information (Legacy Only)

Cross Reference Information (This topic also includes Old File Names to New File Names Mapping and Old Field Names to New Field Names Mapping.

Object Reference

Prior to version 2018

From the Sage 100 ERP Desktop, click the View menu, then click Tasks

In the Tasks pane, under Sage 100 ERP, click Resources.

In the Resources window, click File Layouts and Program Information.

In the File Layouts and Program Information window that appears, select any of the help topics, which are listed below.

Program Listings

File and Table Listings

File Layouts (Open this to see file layouts organized by module and table name)

Data Class Definitions Listing

File Names and Key Information (Legacy Only)

Cross Reference Information (This topic also includes Old File Names to New File Names Mapping and Old Field Names to New Field Names Mapping.

Object Reference

Note: Prior to Sage 100 ERP (formerly Sage MAS 90 and 200) version 4.00, File Layouts information was available on disc, in a TRSG (Technical Reference and Support Guide) CD-ROM

Sage Intelligence requirements

  • Sage Intelligence must be installed as the Network Administrator.
  • Excel must be installed and activated prior to the Sage Intelligence installation.
  • Excel must be closed during installation of Sage Intelligence (also check that there are no remaining EXCEL.EXE processes listed in the Windows Task Manager-Processes tab)

What is the Sage Intelligence Report Utility?

The Sage Intelligence Report Utility is a tool that you can download from our website, which will enable you to automatically import any of the additional free Sage Intelligence reports.

How does the Sage 100 Sage Intelligence Report Utility work?

The Report Utility detects which Sage accounting or business management solution you are running and will show all the available free reports for your solution. You can then select the required reports to be automatically imported into a “New Reports” folder in the Sage Intelligence Report Manager for immediate use. Once you have installed the Report Utility, a shortcut will appear on your desktop, allowing you instant access to our regularly updated library of free reports.

Do I need to download the Sage 100 Sage Intelligence installer every time I want to check for updated reports?

No. You will only need to download the installer once and thereafter you can simply open the Report Utility from your desktop, showing you all the reports available to you.

Can I still download the reports without using the utility?

Yes. These reports may be still available on the Free Reports Group, although you will have to manually download and import each report individually into your Report Manager.

Does a customer have to be on the current version of Sage Intelligence Reporting to use this? Or could a very old Sage Intelligence Reporting version work with this Report Utility?

The Report Utility is compatible with the latest version of Sage Intelligence Reporting, but has not being tested on previous versions. You can however manually access these reports on the Free Reports Group on the Sage Intelligence Community.

Where will I find all the new reports that I have downloaded into the Report Manager?

There will be a new folder automatically added to your Report Manager folders called “New Reports”.

What version of Microsoft® Excel® does the Report Utility support?

Microsoft® Excel® 2010 +

What Sage Solutions are currently catered for?

Sage 50 US 2016, Sage Pastel V14, Sage Evolution V7, Sage 100 2016 (Std & Advanced), Sage 500 ERP 2016, Sage X3, Sage 100 Contractor US & Canadian Edition (v19.6).

How will I know which reports I don’t yet have?

The Report utility does a check against the reports in your Report Manager. Any reports that you do not have in your Report Manager will be selected. You can choose to download the selected reports or choose the unselect all option and then choose the specific reports you are wanting.

What happens if I mistakenly download the same report twice?

The report will be imported into your Report Manager twice, so you will need to delete the duplicate copy of the report.

How do I delete a report in the Report Manager?

Select the report you would like to delete, right click and select delete.

Can I rename these reports?

Yes. To rename the report, right click on the report and select rename. You will then type in what you would like to call the report and select the ok button.

Can I customize these reports?

Yes. To customize a report, we recommend you first take a copy of the report. Run out the copy report and make your changes in Microsoft Excel, and once complete right-click on the report in the Report Manager and choose to Save Excel Template.

Can I share these reports with other people?

If the user has a Sage Intelligence Report manager license we recommend that you share the link to the Report Utility with them. This way they will also have access to the free reports. Alternatively you could also use the normal export and import function of Sage Intelligence Reporting to share the report with others. If you would like to share the report with non-Sage Intelligence users then you would simply share the Excel workbook as per usual.

Can I request reports to be written?

If you can’t find the report you are looking for, we’d love to hear about your report ideas. Reports are are prioritised based on the number of requests received per idea/suggestion, ensuring that customers get what they need, when they need it.

Are there any pre-requisites to using the Sage 100 Sage Intelligence Report Utility?

  • Sage Accounting/BMS solution
  • Sage Intelligence Report Manager
  • .NET Framework 4.5 (this is automatically installed if you don’t have it)
  • Excel 2010+

If I am running two or more Sage Intelligence solutions on my machine how will the Utility work?

When you running the Installer, you will be prompted to say which Sage solution you would like to run it on.

Key functionality

Sage 100 Intelligence Reporting offers you four modules for purchase depending on your reporting requirements:

  1. Sage 100 Report Viewer

Run existing reports, in real time, when you want them.

  1. Sage 100 Report Manager

The Report Manager license allows you to do everything the Report Viewer does, plus it allows you to edit and customize your standard report templates and save them for future use, create new reports, sort drill-down and aggregate your data, and automate the distribution of your reports. Note: Sage 100 Business Care customers receive one Report Manager license for free.

  1. Sage 100 Report Designer

The Report Designer has revolutionized financial reporting! It gives you two methods to create and control your financial reports depending on your Excel knowledge and your unique business requirements.

  1. Sage 100 Connector

The Connector enables you to access and consolidate information from multiple sources.

Sage Intelligence for Accounting

Feature Updates

Sage 100 Sage Intelligence requirements

  • Sage Intelligence must be installed as the Network Administrator.
  • Excel must be installed and activated prior to the Sage Intelligence installation.
  • Excel must be closed during installation of Sage Intelligence (also check that there are no remaining EXCEL.EXE processes listed in the Windows Task Manager-Processes tab)

Excel Financial Functions for Sage Intelligence Quick Reference Guide

NPER function: Returns the number of periods for an investment

Syntax: NPER(rate, pmt, pv, [fv], [type])

Syntax Example: NPER(6%/12 (rate), -175 (pmt), 10000 (pv))

The Excel NPER function calculates the number of periods required to pay off a loan, for a specified constant periodic payment

and a constant interest rate.

FV function: Returns the future value of an investment

Syntax: FV(rate,nper,pmt,[pv],[type])

Syntax Example: FV(11%/12 (rate), 3 years *12 (nper), -1500 (pmt),)

The Excel FV function calculates the future value of an investment with periodic constant payments and a constant interest rate.

PMT function: Returns the periodic payment for an annuity.

Syntax: PMT(rate, nper, pv, [fv], [type])

Syntax Example: PMT(10%/12 (rate),5 years *12 (nper), 100000 (pv))

The Excel PMT function calculates the constant periodic payment required to pay off (or partially pay off) a loan or investment,

with a constant interest rate, over a specified period.

IPMT function: Returns the interest payment for an investment for a given period

Syntax: IPMT(rate,per,nper,pv,[fv],[type])

Syntax Example: IPMT(8%/12 (rate), 4 (per),7 years *12 (nper), 50000 (pv))

The Excel IPMT function calculates the interest payment, during a specific period of a loan or investment that is paid in constant

periodic payments, with a constant interest rate.

NETWORKDAYS function: Returns the number of working days between a start and end date

Syntax: NETWORKDAYS(start_date, end_date, [holidays])

Syntax Example: NETWORKDAYS(01/01/2012 (start_date), 31/01/2012(end_date), 01/01/2012 [holidays])

Returns the number of whole working days between a start and an end date. Working days excludes weekends (Saturday and

Sunday) and any dates identified as holidays. Can be used to calculate the number of days per month, or the start of one month

and the end of another.

NETWORKDAYS.INTL function: Returns the number of working days between a start and end date, allowing for

different specified weekend options

Syntax: NETWORKDAYS.INTL(Start_date, end_date, [weekend], [holidays])

Syntax Example: NETWORKDAYS.INTL(01/01/2012 (start_date), 31/01/2012(end_date), 3 [weekend], 01/01/2012[holidays])

Returns the number of whole workdays between two dates using parameters to indicate which and how many days are weekend

days. Weekend days and any days that are specified as holidays are not considered as workdays. Can use a specific number to

identify the combination of consecutive days (e.g. 3 = Monday and Tuesday), or a string of 0’s and 1’s to identify non-sequential

days (e.g. 0010100 = Wednesday and Friday).

PV function: Returns the present value of an investment

Syntax: PV(rate, nper, pmt, [fv], [type])

Sytnax Example: PV(8%/12 (rate), 8 years*12 (nper), -5000 (pmt))

The Excel PV function calculates the Present Value of an investment, based on a series of future payments

SLN function: Returns the straight-line depreciation of an asset for one period

Syntax: SLN(Cost, salvage, life)

Syntax Example: SLN(10000 (cost), 1000 (salvage), 5 (life))

The Excel SLN function calculates the straight line depreciation of an asset for one period

Excel Financial Functions

Quick Reference Guide

Weekly Excel Tips: www.alchemex.com/blog/excel-tips-tricks/

DOLLARDE function: Converts a dollar price, expressed as a fraction, into a dollar price, expressed as a decimal number

Syntax: DOLLARDE(fractional_dollar, fraction)

Syntax Example: DOLLARDE(

Converts a dollar price expressed as an integer part and a fraction part, such as 1.02, into a dollar price expressed as a decimal

number. Fractional dollar numbers are sometimes used for security prices.

DOLLARFR function: Converts a dollar price, expressed as a decimal number, into a dollar price, expressed as a fraction

Syntax: DOLLARFR(decimal_dollar, fraction)

Syntax Example: DOLLARFR(1.09235 (decimal_dollar), 32 (fraction))

The Excel DOLLARFR function converts a dollar value in decimal notation into a fractional notation. The DOLLARFR and DOLLARDE

functions are designed for working with security prices, which are often quoted as fractional values.

CUMIPMT function: Returns the cumulative interest paid between two periods

Syntax: CUMIPMT(rate, nper, pv, start_period, end_period, type)

Syntax Example: CUMIPMT(5%/12 (rate),6 years * 12 (nper), 100000 (pv), 1 ( start_period), 12 (end_period, 0 (type)

The Excel CUMIPMT function calculates the cumulative interest paid on a loan or investment, between two specified periods.

CUMPRINC function: Returns the cumulative principal paid on a loan between two periods

Syntax: CUMPRINC(rate, nper, pv, start_period, end_period, type)

Syntax Example: CUMPRINC(5%/12 (rate),6 years * 12 (nper), 100000 (pv), 1 ( start_period), 12 (end_period, 0 (type)

The Excel CUMPRINC function calculates the cumulative payment on the principal of a loan or investment, between two specified

periods.

DB function: Returns the depreciation of an asset for a specified period by using the fixed-declining balance method

Syntax: DB(cost, salvage, life, period, [month])

Syntax Example: DB(15000 (cost), 1500 (salvage), 5 (life), 1 (period))

The Excel DB function calculates the depreciation of an asset, using the Fixed Declining Balance Method, for each period of the

asset’s lifetime.

DDB function: Returns the depreciation of an asset for a specified period by using the double-declining balance method or some

other method that you specify

Syntax: DB(cost, salvage, life, period, [factor])

Syntax Example: DB(12000 (cost), 1200 (salvage), 3 (life), 1 (period))

The Excel DB function calculates the depreciation of an asset, using the Double Declining Balance Method, or another specified

depreciation rate.

EFFECT function: Returns the effective annual interest rate

Syntax: EFFECT(nominal_rate, npery)

Syntax Example: EFFECT(10% (nominal_rate, 4 (npery)

The Excel EFFECT function returns the effective annual interest rate for a given nominal interest rate and number of compounding

periods per year. The NPERY parameter refers to the number of compounding periods per year.

General Program Shortcuts

Excel Keyboard Shortcuts.

Ctrl+N: Create a new workbook

Ctrl+O: Open an existing workbook

Ctrl+S: Save a workbook

F12: Open the Save As dialog box

Ctrl+W: Close a workbook

Ctrl+F4: Close Excel

F4: Repeat the last command or action. For example, if the last thing you typed in a cell is “hello,” or if you change the font color, clicking another cell and pressing F4 repeats that action in the new cell.

Shift+F11: Insert a new worksheet

Ctrl+Z: Undo an action

Ctrl+Y: Redo an action

Ctrl+F2: Switch to Print Preview

F1: Open the Help pane

Alt+Q: Go to the “Tell me what you want to do” box

F7: Check spelling

F9: Calculate all worksheets in all open workbooks

Shift+F9: Calculate active worksheets

Alt or F10: Turn key tips on or off

Ctrl+F1: Show or hide the ribbon

Ctrl+Shift+U: Expand or collapse the formula bar

Ctrl+F9: Minimize the workbook window

F11: Create a bar chart based on selected data (on a separate sheet)

Alt+F1: Create an embedded bar chart based on select data (same sheet)

Ctrl+F: Search in a spreadsheet, or use Find and Replace

Alt+F: Open the File tab menu

Alt+H: Go to the Home tab

Alt+N: Open the Insert tab

Alt+P: Go to the Page Layout tab

Alt+M: Go to the Formulas tab

Alt+A: Go to the Data tab

Alt+R: Go to the Review tab

Alt+W: Go to the View tab

Alt+X: Go to the Add-ins tab

Alt+Y: Go to the Help tab

Ctrl+Tab: Switch between open workbooks

Shift+F3: Insert a function

Alt+F8: Create, run, edit, or delete a macro

Alt+F11: Open the Microsoft Visual Basic For Applications Editor

Moving Around in a Worksheet or Cell

You can use keyboard shortcuts to easily navigate throughout your worksheet, within a cell, or throughout your entire workbook.

  • Left/Right Arrow: Move one cell to the left or right
  • Ctrl+Left/Right Arrow: Move to the farthest cell left or right in the row
  • Up/Down Arrow: Move one cell up or down
  • Ctrl+Up/Down Arrow: Move to the top or bottom cell in the column
  • Tab: Go to the next cell
  • Shift+Tab: Go to the previous cell
  • Ctrl+End: Go to the most bottom right used cell
  • F5: Go to any cell by pressing F5 and typing the cell coordinate or cell name.
  • Home: Go to the leftmost cell in the current row (or go to the beginning of the cell if editing a cell)
  • Ctrl+Home: Move to the beginning of a worksheet
  • Page Up/Down: Move one screen up or down in a worksheet
  • Alt+Page Up/Down: Move one screen to the right or left in a worksheet
  • Ctrl+Page Up/Down: Move to the previous or next worksheet

Selecting Cells

You may have noticed from the previous section you use the arrow keys to move between cells, and the Ctrl key to modify that movement. Using the Shift key to modify the arrow keys lets you extend your selected cells. There are also a few other combos for speeding up selection, as well.

  • Shift+Left/Right Arrow: Extend the cell selection to the left or right
  • Shift+Space: Select the entire row
  • Ctrl+Space: Select the entire column
  • Ctrl+Shift+Space: Select the entire worksheet

Learn How to Edit a cell using Sage Intelligence

  • Shift+F2: Add or edit a cell comment
  • Ctrl+X: Cut contents of a cell, selected data, or selected cell range
  • Ctrl+C or Ctrl+Insert: Copy contents of a cell, selected data, or selected cell range
  • Ctrl+V or Shift+Insert: Paste contents of a cell, selected data, or selected cell range
  • Ctrl+Alt+V: Open the Paste Special dialog box
  • Delete: Remove the contents of a cell, selected data, or selected cell range
  • Alt+Enter: Insert a hard return within a cell (while editing a cell)
  • F3: Paste a cell name (if cells are named in the worksheet)
  • Alt+H+D+C: Delete column
  • Esc: Cancel an entry in a cell or the formula bar
  • Enter: Complete an entry in a cell or the formula bar

How to Format Cells using Sage Intelligence is just as easy as in Excel

  • Ctrl+B: Add or remove bold to the contents of a cell, selected data, or selected cell range
  • Ctrl+I: Add or remove italics to the contents of a cell, selected data, or selected cell range
  • Ctrl+U: Add or remove underline to the contents of a cell, selected data, or selected cell range
  • Alt+H+H: Select a fill color
  • Alt+H+B: Add a border
  • Ctrl+Shift+&: Apply outline border
  • Ctrl+Shift+_ (Underline): Remove outline border
  • Ctrl+9: Hide the selected rows
  • Ctrl+0: Hide the selected columns
  • Ctrl+1: Open the Format Cells dialog box
  • Ctrl+5: Apply or remove strikethrough
  • Ctrl+Shift+$: Apply currency format
  • Ctrl+Shift+%: Apply percent format
  • Accounting Business Solutions, Accounting Business Solutions by JCS, JCS Computer Resource, JCS, JCS software, sage 100, quickbooks, sage 50, MISys, Sage 100 manufacturing

sage 100 analytics, sage 100 bi, sage 100 business intelligence, sage 100 business object interface, sage 100 contractor report writer, sage 100 crystal reports, sage 100 crystal reports training, sage 100 custom reports, sage 100 customization, sage 100 dashboards, sage 100 intelligence reporting, sage 100 power bi, sage 100 report writer, sage 100 reports, sage 100 vs sage 50,
Microsoft Power BI Sage Intelligence Tools

Microsoft Power BI Sage Intelligence Tools

Microsoft Power BI is a business analytics tool. Delivering insights, enabling fast informed decisions by  creating very powerful dashboards for Sage 100 Cloud. JCS is experienced in working with small businesses using these tools and accounting software. JCS can help you develop and understand your requirements.  These are the benefits to leveraging this tool.

  • Transform your data into stunning visuals that are easy to understand.
  • Share them with colleagues on any device so your team can see where you are going.
  • Visually explore and analyze business information at staff and operations meetings.
  • Versions can be on-premises or in the cloud and all in one view so you can share.
  • Review any data from anywhere anyway you choose to see it.
  • Collaborate on and share customized dashboards and interactive reports with groups.
  • Scale across your organization with built-in governance and set strong security access.
  • Give us a call 800-475-1047 or email solutions@jcscomputer.com

But Frequently asked Questions:

Question: How fast is the use of Microsoft Power BI growing?

Answer: In the enterprise world Microsoft Power BI is first choice of many organizations as an add-on. Because it can be used for reporting on financial and business data for most software.

Question: How can I learn Microsoft Power BI?

Answer: You should start with Power BI guided learning provided by Microsoft but, another way is for consultants to provide online training dealing with fundamentals as well as some advanced concepts and easy examples.

Question: Can I share or collaborate my report on Power BI with colleagues?

Answer: Yes, you can share your report by printing, Publishing to the web, sharing dashboards or reports with a few people, from the service or the Power BI mobile apps, Bundling those dashboards and reports into apps and publishing them to a larger group or your whole organization. In any option you need a Power BI pro license or or the content needs to be in a Premium capacity. License requirements vary for the colleagues who view your dashboards, depending on the option you choose.

What accounting software can I use this with?

For choosing appropriate license, our experts will assist you using the following accounting software systems. For details contact us. 800-475-1047

  • Sage 100 Cloud
  • Sage 50 Cloud
  • QuickBooks
  • Microsoft Power BI Sage Intelligence New Tools

How many business use Microsoft Power BI?

Answer: We have found over 10,000 companies using Microsoft power BI and the companies using Microsoft power BI are most often found in United States and in the Computer Software industry. Microsoft power BI is most often used by companies with 50-200 employees and 1M-10M dollars in revenue.

Period-end processing in Sage 100 Sales Order

This time of year, period-end processing in Sage 100 is a useful feature to know. Learn how to use period-end processing in Sage 100 with the Sage 100 Sales Order training class from Accounting Business Solutions by JCS today!


Sales Order Utilities & Period-End Processing

Note: Back up your data before purging the data.

Purge Expired Orders/Quotes: Use Purge Expired Orders/Quotes to remove expired master orders, expired repeating orders, and expired price quotes.

  • All selected orders and quotes that expired on or before the date entered are permanently removed from the system.
  • After the purge is complete, the System Activity Log is updated with the date, time, company code, user logon, purge description, and purge date.

Purge Obsolete Sales Orders: Use Purge Obsolete Sales Orders to remove all obsolete sales orders or back orders whose order dates are on or before the date entered.

  • You can also enter a selection of sales order numbers to remove.
  • After the purge is complete, the System Activity Log is updated with the date, time, company code, user logon, purge description, and purge date.
    • This task is available only if Invoice Data Entry and Shipping Data Entry are not in progress.

Purge Order/Quote History: Use Purge Order/Quote History to remove sales order and quote history records whose order dates are on or before the date entered.

  • After the purge is complete, the System Activity Log is updated with the date, time, company code, user logon, purge description, and purge date.
  • Other than individually deleting price quotes or sales orders, this is the only way to remove these transactions.
    • This task is available only if the Retain Sales Orders/Quote History check box is selected in Sales Order Options.

Purge Lot/Serial History: Use Purge Lot/Serial History to remove lot and serial history records whose order dates are on or before the date entered.

  • After the purge is complete, the System Activity Log is updated with the date, time, company code, user logon, purge description, and purge date.
    • This task is available only if an option other than None is selected at the Retain Lot/Serial Item Sales History field in Sales Order Options.

Purge Sales History: Use Purge Sales History to remove sales history records based on the posting or invoice date. Records dated on or before the year-end date selected are permanently removed from the system.

  • You can only purge history that is more than two years prior to the current year.
  • After the purge is complete, the System Activity Log is updated with the date, time, company code, user logon, purge description, and purge date.
  • The options available vary based on whether Inventory Management is set up and if Fiscal Periods or Calendar Months is selected at the Base Inventory Periods On field in Inventory Management Options.
    • This task is available only if the number of years to retain sales history selected at the Years to Retain Sales History field in Sales Order Options is greater than 2.

Purge Sales Order Recap: Use Purge Sales Order Recap to remove sales orders from the Sales Order Recap file with order dates on or before the date entered.

  • After the purge is complete, the System Activity Log is updated with the date, time, company code, user logon, purge description, and purge date.
    • If the Purge Sales Order Recap at Period End check box is selected in Sales Order Options, this task is automatically run at period-end.
  • This affects the Sales Order Recap file only. It does not affect the Open Sales Order file.


Create Sales Order/Quote History:  Use Create Sales Order/Quote History to create sales order history files if sales order history was not previously retained to migrate from Sage MAS 90 to Sage MAS 500.

  • When the sales order and quote history files are created, the System Activity Log is updated with the date, time, company code, user logon, and utility description.
    • This task is available only if the Retain Sales Order/Quote History check box is selected in Sales Order Options.
  • Can also run this utility from Sales Order Options by selecting the Retain Sales Orders/Quote History check box and clicking Yes when prompted to create sales order and quote history if data exists in the data entry files but not in the sales history files.
    • Note: Back up your data before running this utility.

Period-End Processing

The following actions are performed when the period is closed:

  • Prompts the user to print the monthly reports.
  • It purges Sales Order Recap based on the selection made in Sales Order Options.
  • If retaining customer sales history, all current-year sales information is updated to the Last Year fields and any sales history for customers with no current-year activity is removed based on the number entered at the Years to Retain Sales History field in Sales Order Options.
  • Increments the current period in Sales Order Options.


To learn more about period-end processing in Sage 100 Sales Order, call the Sage 100 experts at Accounting Business Solutions by JCS today at 800-475-1047 or email us at solutions@jcscomputer.com. Our experienced Sage 100 consultants offer Sage 100 training classes, including how to use period-end processing in Sage 100 ERP, Sage 100 Manufacturing, and Sage 100cloud.

Tracking Sales Orders in Sage 100

Learn about Tracking Sales Orders in Sage 100 in Sage 100 in Sage 100 with Sage 100 training classes from Accounting Business Solutions by JCS!


Tracking Sales Orders in Sage 100

Open Sales Order Report

Use the Open Sales Order Report to view information for all or a selected group of open sales orders. A variety of options for this report make it a helpful tool for tracking and analyzing sales orders. These options include:

  • Ability to base the selection criteria on a sales order number, customer number, ship date, bill-to name, and salesperson
  • Option to include just new, open, or on hold sales orders
  • Ability to include all order types, just one order type, or a combination of order types
  • The extension calculation amount can include the amount ordered or just the amount remaining
  • You can print the report in either a detailed or summary format

Open Orders by Item Report

Use the Open Orders by Item Report to view open orders by item number or description. This is helpful for analyzing or tracking which items are needed to fill open orders. The options on this report include:

  • Ability to include all order types, just one order type, or a combination of order types
  • Choice of whether miscellaneous and special items are included
  • Options for how kit lines appear
  • Ability to base the selection criteria on item number, product line, and warehouse

Open Orders by Job Report

Use the Open Orders by Job Report to view open sales orders by job number. Print this report to track the job numbers of items on open orders, pending processing and shipment.

  • The report is sorted automatically by job number.
  • Ability to base the selection criteria on item codes, job numbers, customer numbers, product lines, and warehouse codes to print.
  • You can print this report in a summary or detail format.
  • This report is available only if Job Cost is activated and integrated with Sales Order.

Open Orders by Promise Date Report

Use the Open Order By Promise Date Report, sorted by promise date, to assist you in ensuring you are meeting obligations to your customers in a timely manner. The promise date is the date you indicate the order would ship.

Sales Order Recap

Use the Sales Order Recap report to view all sales order numbers processed and whether they are open, completed, or deleted. The information on this report is kept indefinitely unless you indicated in Sales Order Options that it should purge at period end or it is manually purged using Purge Sales Order Recap on the Utilities menu.

Back Order Report

Use the Back Order Report to view detailed information on all back orders by item, by customer, or by bill-to name. The information for each back order includes the order number and date, the ship date, and the customer number and name.


Are you interested in learning about Tracking Sales Orders  in Sage 100? Accounting Business Solutions by JCS offers Sage 100 training classes, including Tracking Sales Orders in Sage 100.  Call us today at 800-475-1047 or email us at solutions@jcscomputer.com today to get started.

Sales Order Shipping in Sage 100

Learn about Sales Order Shipping in Sage 100 in Sage 100 in Sage 100 with Sage 100 training classes from Accounting Business Solutions by JCS!


Sales Order Shipping in Sage 100

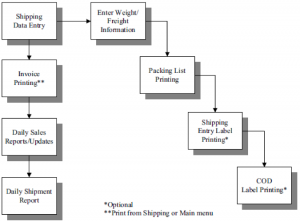
Sales Order provides a shipping entry system that warehouse personnel can use to quickly and accurately enter items to ship. The shipping entries are normally made after the order is entered but before it is invoiced. Entry is made using either the keyboard or a scanner and only the fields needed by the warehouse staff to pick and pack items for shipment are displayed. Shipping must be enabled in Sales Order Options BEFORE it can be used.

In addition to the features available in Shipping Data Entry, you can link to the power of a multi-carrier shipping program called StarShip developed by V-Technologies. This application automatically calculates freight for a variety of carriers such as United Parcel Service, the US Postal Service, and Federal Express. StarShip produces shipping labels and manifests and performs inquiries on shipments. In addition to Shipping Data Entry, you can access StarShip from Invoice Data Entry and Shipping History Inquiry if StarShip is installed. The StarShip Add-On is NOT taught in this class


Processing Shipments using the Shipping Features


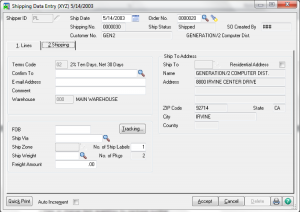
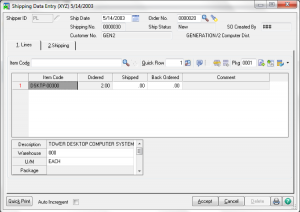
Shipping Data Entry – Lines


  • Record quantities shipped and back ordered.
  • Cannot add new lines to an order.
  • Drop ship items are not available.
  • Unshipped quantities for item lines where back orders are not allowed, will be cancelled automatically.
  • Buttons are available to either backorder all remaining items or ship them.
  • Lot/Serial # items will require distribution.
  • Package number can be set to allow tracking to a specific package.
  • A barcode scanning device can be sued to facilitate rapid data entry.


Item Package Maintenance

  • View or change item quantities by package number.

Shipping Data Entry – Shipping


  • Ship Weight field is available if set to allow in Shipper ID Maintenance.
  • Entry in Sales Order Options determines if default weight appears and what is seen in Ship Weight lookup.
  • If set to calculate from weight recorded in Inventory, items on order should have the same units of measure as weight recorded.
  • The Tracking button allows entry of tracking numbers by package. This information will be automatically populated by StarShip if installed and used.
  • ISHIP Shipping Tools web site can be viewed from the Package Tracking button.

Invoicing Shipping Entries

Accepting a shipping entry stores the document in the same files as Sales Order Invoice Entry. Security settings control how invoices from shipped orders are printed. Either it print with the shipping documents or someone needs to print them through one of the other available processes. Orders entered through Shipping Data Entry can be modified from the same entry window if necessary until updated. They can also be viewed and modified as needed through the Sales Order Invoice Entry window until updated.

Packing List Printing


Are you interested in learning about Sales Order Shipping  in Sage 100? Accounting Business Solutions by JCS offers Sage 100 training classes, including Invoicing Sales and Updating Orders in Sage 100.  Call us today at 800-475-1047 or email us at solutions@jcscomputer.com today to get started.

Invoicing Sales and Updating Orders in Sage 100

Learn about Invoicing Sales and Updating Orders in Sage 100 in Sage 100 with Sage 100 training classes from Accounting Business Solutions by JCS!


Invoicing Sales and Updating Orders in Sage 100

Batch Entry

Automatically Generating Invoices from Orders

  • You can select orders by order number, date, customer number, salesperson, ship date, or promise date.
  • You can select expired orders and select sales orders by cycle code when generating invoices from repeating orders.
  • After the selection criteria is defined for the orders to invoice, click Proceed.
    • The system selects the order based on the selection criteria but does not generate an invoice until you print and update the Auto Generate Invoice Selection Listing.
  • To print the Auto Generate Invoice Selection Listing, click the Print button.
  • After printing the listing, you are prompted to generate the invoice batch. No invoices are generated unless you click Yes at this prompt.
    • You can clear the orders previously selected by returning to Auto Generate Invoice Selection and clicking Clear.
  • You can modify or delete invoices generated in this task using Invoice Data Entry.
  • You can print the invoices in Invoice Data Entry or by selecting Invoice Printing on the Main menu.

Sales Order Invoice Data Entry – Default Values

You can save default values for just the current Sales Order Invoice Entry session or for future sessions as well. Values saved for future session are stored by user logon or workstation. You can change this information for each invoice if necessary.

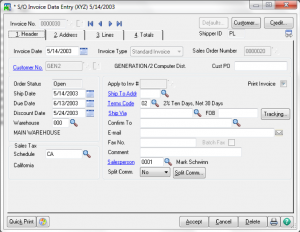
Sales Order Invoice Data Entry – Standard Invoice – Header


  • An Invoice number is required.
    • Enter an Open Sales Order number to invoice an order.
  • Master and Repeating orders cannot be invoiced directly. They must first be opened as a standard order.
  • Invoices do not require an order. The can be entered from scratch.

Sales Order Invoice Data Entry – Addresses


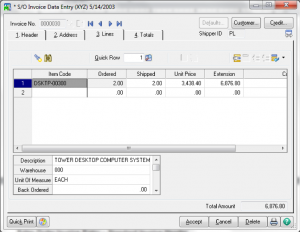
Sales Order Invoice Data Entry – Lines


  • When first entering the lines tab a prompt will allow for all items to be shipped.
  • Any line item or field may be modified.
  • Any item form the original order not flagged as shipped when the invoice is saved will automatically be placed on backorder and the order type changed to Back Order.
  • Lot/Serial # items will require distribution.

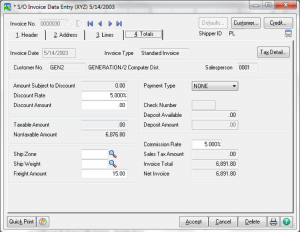
Sales Order Invoice Data Entry – Totals


  • Options for Payment Type are the same as in Sales Order Entry – Totals.
  • A deposit reduces the invoice balance and the GL debit account assigned to that payment type is debited.
  • Quick Print.

Sales Order Invoice Data Entry – Other Tasks

  • Customer Data review or maintenance.
  • Customer Credit History Checking

Sales Order Invoice Data Entry – Cash Sales

  • This is a specific Invoice Type.
  • The cash sales account is debited instead of the AR account. It is defined in A/R Division Maintenance.
  • Customer balance will not be increased.
  • Must still record the actual receipt of cash through A/R Cash Receipt Entry to affect the cash account.

Sales Order Invoice Data Entry – Debit Memos

  • Select the invoice type of Debit Memo to enter a debit memo and follow the same procedures as entering an invoice to increase a customer’s balance.
  • Debit memos are normally issued to a customer for billing errors, freight not billed, or other miscellaneous charges.
  • Enter all amounts as positive amounts.

Sales Order Invoice Data Entry – Credit Memos

  • Select the invoice type of Credit Memo and follow the same procedures as entering an invoice to track sales returns, reduce a customer balance or return inventory to stock.
  • For open-item customers, you can apply the credit memo to a specific invoice or after the fact in Cash Receipts Entry.
  • For balance forward customers, credit memos are automatically applied to the customer’s balance.
  • Enter all amounts as positive amounts.
  • You can return assembled kits to inventory assembled by clicking Yes to ship from stock or disassembled by clicking No to ship from stock.

Printing Invoices

Generating COD Labels


Are you interested in learning about Invoicing Sales and Updating Orders  in Sage 100? Accounting Business Solutions by JCS offers Sage 100 training classes, including Invoicing Sales and Updating Orders in Sage 100.  Call us today at 800-475-1047 or email us at solutions@jcscomputer.com today to get started.

Settling Credit Card Payments in Sage 100

Learn about Settling Credit Card Payments in Sage 100 with Sage 100 training classes from Accounting Business Solutions by JCS!

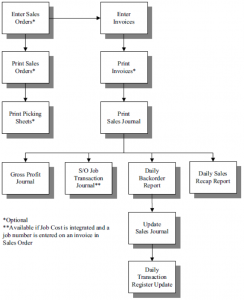
Settling Credit Card Payments in Sage 100 – Printing Daily Sales Reports and Updating

Sales Order Gross Profit Journal

  • The Sales Order Gross Profit Journal is used as an audit trail. It details net sales, cost of goods sold, gross profit, and associated general ledger accounts for each invoice line item.
  • This is an optional report and is available only if you selected to print this report in Sales Order Options. You cannot reprint it after the invoices are updated.
  • Use this report to track commission on gross profit or by inventory item.

Daily Back Order Report

  • The Daily Back Order Report lists all back orders generated in Invoice Data Entry.

Daily Sales Recap Reports

  • The Sales Recap Reports provides information about your daily sales.
  • The reports printed at this time are selected in Sales Order Options.

Daily Deposit Recap Report

  • The Daily Deposit Recap Report provides a recap by payment type of all deposit payments applied against invoices for the current Sales Journal.
  • This report is only printed if the Print Daily Deposit Recap Report check box is selected in Sales Order Options and if a credit card transaction exists.
  • This report summarizes all credit card, check, and cash deposits received for the Sales Journal.

Sales Order Batch Authorization

Sales Order Batch AuthorizationReport

  • The Sales Order Batch Authorization report provides a log of credit card batch authorizations performed on sales orders and their results.
  • Print this report to begin the credit card batch authorization process on sales orders.

Note: This report is available only if the Enable Batch Authorizations check box is selected in Library Master Company Maintenance.

S/O Job Transaction Report

  • The S/O Job Transaction Report provides all job cost information updated from Sales Order.
  • Printing the journal does not automatically update to the permanent fields.

Note: This report is only available if Job Cost is activated and integrated with Sales Order and a job number is entered on the invoice.

Summary Package Tracking

  • Use Summary Package Tracking to view and track packages shipped. Click Tracking in Shipping History Inquiry or Invoice History Inquiry to open Summary Package Tracking.

You can also use Customer Maintenance if a customer calls to inquire about their shipment by selecting the invoice on the Invoices tab, clicking the Invoice History button, and then clicking Tracking to open the Summary Package Tracking window.


Are you interested in learning about Settling Credit Card Payments  in Sage 100? Accounting Business Solutions by JCS offers Sage 100 training classes, including Settling Credit Card Payments in Sage 100.  Call us today at 800-475-1047 or email us at solutions@jcscomputer.com today to get started.

Sales Order Reports in Sage 100

Learn about Sales Order Reports in Sage 100 with Sage 100 training classes from Accounting Business Solutions by JCS!

Sales Order Reports in Sage 100

Sales Order Reports in Sage 100

Accounts Receivable Invoice History Report

  • Use the Accounts Receivable Invoice History Report to view a detailed listing of invoice information using Invoice Data Entry. If Sales Order or Job Cost is integrated with Accounts Receivable, you can also access invoice history information for invoices entered in these modules.
    • This report is only available if you selected Yes or Summary at the Retain in Detail field in Accounts Receivable Options.
  • Both Accounts Receivable and Sales Order invoices appear.
  • You can print a detailed listing of invoice information recorded in Invoice Data Entry.
  • Line item detail information is also provided for each invoice if you selected Yes at the Retain in Detail field in Accounts Receivable Options.

Invoice History Printing

  • Use the Invoice History Printing report to reprint multiple invoices after they are updated.
    • You can reprint invoices only if you selected Yes at the Retain in Detail field in Account Receivable Options.
  • You must print the different types of invoices separately.
  • You can choose to reprint only unpaid invoices for open item customers (for collection purposes).
  • Unlike Invoice History Inquiry, you can reprint more than one invoice at a time.

Accounts Receivable Trial Balance

  • Use the Accounts Receivable Trial Balance report to view a complete recap of the Accounts Receivable invoices.
  • The report details receipts and adjustments and other activities which affect Accounts Receivable balances.
    • This report is based on the posting date and it is the suggested report for reconciling to General Ledger.

Deposit Transaction Report

  • Use the Deposit Transaction Report to view a list of deposit payment transactions recorded in Sales Order. This report is available only if an option other than None is selected at the Retain Deposit Transaction History field in Accounts Receivable Options.
    • You have the option of including a range of payment types, customers, and transaction dates.
    • Information on the report includes the payment type, invoice number, date, and amount.
    • When the report is printed, you have the option of purging the data included on the report.

Monthly Sales Report

  • Use the Monthly Sales Report to produce a recap of sales activities for the period entered in Accounts Receivable. If using divisions, the report sorts by division.
    • You cannot change the period ending dates on this report.
  • You should print the report before closing the period.

Sales Analysis by Salesperson

  • Use the Sales Analysis by Salesperson report to produce a recap of: total sales, cost of goods sold, and profit percentages for each salesperson.
    • You can select which fiscal year and period to include on the report.
    • You can also determine if period to date, year to date, and prior year totals are provided for the period and year selected.
  • The information detailed in this report allows you to compare accounts receivable activity by salesperson and customer. You should print this report before closing the period.


Are you interested in learning about Sales Orders Reports  in Sage 100? Accounting Business Solutions by JCS offers Sage 100 training classes, including Sales Order Reports in Sage 100.  Call us today at 800-475-1047 or email us at solutions@jcscomputer.com today to get started.

Sales Order Entry in Sage 100

Learn about Sales Order Entry in Sage 100 in Sage 100 with Sage 100 training classes from Accounting Business Solutions by JCS!


Entering Sales Orders

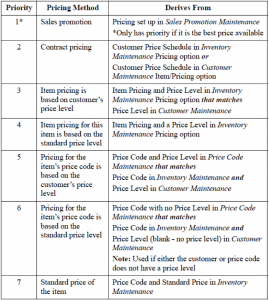
Pricing Hierarchy


Sales Orders Types

  • Standard Order
  • Master Order
  • Repeating Order
  • Price Quote
  • Back Order

Sales Orders Entry – Default Values

You can save default values for just the current Sales Order entry session or for future sessions as well. Values saved for future session are stored by user logon or workstation.


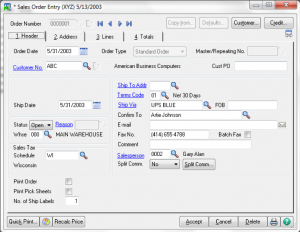
Sales Orders Entry – Header


  • Customer information comes from Accounts Receivable.
  • Order Type may not be changeable after entry on the Line tabe has taken place.
  • Order Status
    • New: This is the default status assigned to a Sales Order when entered. The status is automatically updated to the status of Open when it is printed.
    • Hold: When status is changed to Hold, the Reason field becomes available. You cannot print Sales Orders with the status of Hold until the status has been changed to Open.
    • Open: You can assign the status of Open at any time, whether the order is printed or not, but the status will change to Open automatically when it is printed.
  • Other Fields.
  • Commission Options.
  • If MAS is linked to Sage CRM, additional fields may appear.

Sales Orders Entry – Address

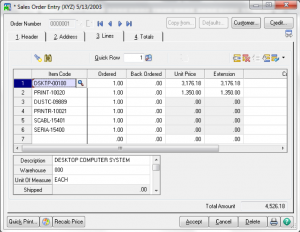
Sales Orders Entry – Lines

Only certain types of line item entries can be made.

  • Inventory Items
  • Sales Kits
  • Miscellaneous Items and Charge Codes
  • Comments
  • Special Items


  • Choose the Alias Item button to view alias item codes
  • Item Inquiries (item status, price lookups and alternates are available)
  • On-the-Fly Inventory items can be entered if allowed in Options.
  • Extended Descriptions button
  • items and comment codes are selected by using a forward slash (/) prefix.
  • Special Items are designated by an asterisk (*) prefix (can distribute sales and cost of sales directly to a GL acct, will drop ship automatically is set to do so in Options).
  • Sales Kit button
  • Customer Last Purchase
  • Secondary Grid fields
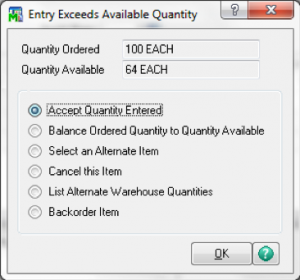
  • Exceeding Available Quantity Options


  • Available Quantities are automatically checked if told to in Options.
  • Accepting an exceeded quantity will over distribute resulting in a negative qty. available.
  • Quantity on Sales Order field in inventory is updated when the line entry is accepted.
  • Lines for Back Orders
    • Are generated automatically during normal processing whenever quantity shipped is less than quantity ordered
    • When entering manually, enter both quantity shipped and quantity ordered.


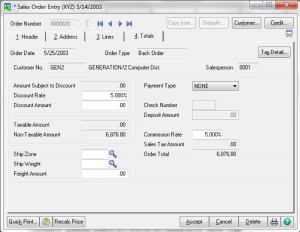
Sales Orders Entry – Totals


  • Amounts subject to tax are automatically calculated. View from Tax Detail button
  • Freight can be calculated based on ship code if selected in Options.
  • Deposits for complete payments may be entered. There however no posting for deposits or balance until order is invoiced.
    • Deposits reduce the amounts that get posted to the AR account, posting instead to customer deposits.
  • Selecting the CREDIT CARD payment type will result in a request for Credit Card information..
    • New authorization codes are required each time the deposit amount increases.

Sales Orders Entry – Other

  • Customer Data review or maintenance.
  • Customer Credit Checking
  • Quick Print
  • Copy From

Master Orders

  • ‘Blanket’ Order.
  • on SO field in Inventory is not updated when original Master Order is created.
  • New Standard Orders are issued against Master Orders for shipping and invoicing.
  • A cycle code may be assigned on the Master Order to use as selection criteria for automatic order generation by using Auto Generate Order Selection.
  • Cumulative quantities ordered and received are tracked on the Master Order.
  • Quantity remaining is defaulted for new order based on Master Orders.
  • Expiration (expired Master Orders are purged from Utilities)


Repeating Orders

  • Use as a template for routine standard orders.
  • All order data is stored with the order.
  • on SO field in Inventory is not updated when original Repeating Order is created.
  • Copy to Use or apply a standard order against.
  • A cycle code may be assigned on the Repeating Order to use as selection criteria for automatic order generation by using Auto Generate Order Selection.
  • Repeating Orders track last standard order date and number issued against it.
  • Original order quantity is defaulted for new order based on Repeating Order.
  • Expiration (expired Repeating Orders purge automatically during period end processing or can be manually purged from Utilities)

Automatically Generate Sales Orders

  • For Master or Repeating Orders.
  • Expired or on hold orders may be optionally selected.
  • Selected orders are not generated until the Listing is printed and updated.

Price Quotes

  • Customers may be added On-the-Fly.
  • Item pricing, discounts, freight, and other calculations take place just as they would on a Sales Order.
  • Quantity on hand checking is performed, but nothing is updated inventory.
  • Can be printed individually or in groups.
  • Can be easily converted to a Sales Order.

Printing Sales Orders

Printing Picking Sheets

  • Picking sheets for orders with drop ship or back order items cannot be printed.
  • Picking sheets can be reprinted.
  • If activated, Bill of Material bill options can also be printed.
  • Use Clear to remove previous selections.

Printing Shipping Labels

Entering Customer Deposits

  • Cash Receipts Entry in Accounts Receivable is used to record the receipt of either a deposit (prepayment) or payments against outstanding customer balances.
  • Deposits by cash, check or credit card are enterd in C ash Receipts Entry.
  • Only record credit card deposits when you want to recognize cash at the time of the order.

Daily Drop Ship Report

  • Only items designated as drop ship will appear on this report.
  • Report is sorted by Vendor and Item Number with totals for each.
  • Information can be optionally cleared after printing.
  • The Daily Drop Ship file can be cleared at any time.


Are you interested in learning about Sales Order Entry  in Sage 100? Accounting Business Solutions by JCS offers Sage 100 training classes, including Sales Order Entry in Sage 100.  Call us today at 800-475-1047 or email us at solutions@jcscomputer.com today to get started.

Sales Order Inquiries in Sage 100

Learn about Sales Order Inquiries in Sage 100 with Sage 100 training classes from Accounting Business Solutions by JCS!

Sales Order Inquiries in Sage 100

Invoice History Inquiry

  • Use Invoice History Inquiry to view and reprint previously updated invoices.
    • Information is displayed by invoice and you cannot modify the information.
    • You can only reprint invoices if you selected Yes at the Retain in Detail field in Accounts Receivable Options.
  • If you selected Summary at this field, you can access only invoice header information and you cannot reprint invoices.
  • Inquire on a delivery status using the tracking information
    • Note: This task is also available on the Accounts Receivable Main menu.

Inventory Inquiry

  • Use Inventory Inquiry to review information for a specific inventory item.
    • You can access item information without the ability to make changes.
    • Uses the same tabs of information accessible in Inventory Maintenance.
      • This task is only available if Sales Order is integrated with Inventory Management.
      • Note: This task is also available on the Inventory Management Main menu.

Sales Order/Quote History Inquiry

  • Use Sales Order/Quote History Inquiry to view all information for sales orders and quotes.
    • View quote information if the invoice is created using the original quote generated.
    • View deleted sales orders, quotes, and line items if you selected to retain deleted sales orders, quotes, and line items in Sales Order Options.
      • If retaining deleted orders, quotes, or lines using the Prompt option, you can also view the cancellation codes.

RMA Inquiry

  • Use RMA Inquiry to view all return merchandise authorizations created in RMA Data Entry and RMA Receipts Entry.
    • You can inquire on an invoice or a customer for the selected RMA
    • You can view the customer credit history information by clicking Credit.

Shipping History Inquiry

  • Use Shipping History Inquiry on the Shipping menu to view shipments entered in Shipping Data Entry and updated during the Sales Journal update.
    • This task is available only if the Enable Shipping check box is selected in Sales Order Options and if Yes or Summary is selected at the Retain in Detail field in Accounts Receivable Setup Options
  • You can access the Lines tab only if Yes is selected at the Retain in Detail field in Accounts Receivable Options
    • Note: Shipping history information is stored in Accounts Receivable.

Are you interested in learning about Sales Orders Inquiries  in Sage 100? Accounting Business Solutions by JCS offers Sage 100 training classes, including Sales Order Inquiries in Sage 100.  Call us today at 800-475-1047 or email us at solutions@jcscomputer.com today to get started.

X