Premium Crystal Reports in Sage 50 and Sage 50cloud

Which premium Crystal Reports are included in in Sage 50? 

Premium Crystal Reports included in Sage 50 include:


Assembly Item UPC_SKU Label

Using UPC/SKU (Universal Price Code/Stock Keeping Unit) labels can help you keep track of your inventory more accurately. The individual components you purchase from vendors may already contain their own UPC/SKU labels. However, you can use the Assembly Item UPC_SKU Label report to create labels for the finished products once the items are fully assembled. The labels include the following information:

  • Item ID
  • Item Description
  • UPC/SKU Number
  • Location


Assembly Planning 

This report displays details for a specified assembly, including the number of components needed, available, and on hand for the assembly. This report is helpful if printed before beginning the production of an assembly because it provides the status of the necessary components. The report includes the following fields:

  • Item ID
  • Description
  • Quantity Needed
  • Quantity on Hand
  • Quantity Available


Component Pick List

This report displays an itemized list of the locations and quantities of all components required for the specified assembly item. It is helpful to run this report right before you are about to assemble an item. The report includes the following fields:

  • Component ID
  • Description
  • Quantity Needed
  • Location
  • Initials


Deficient Components List

This report is useful for viewing which bill of material components of an assembly are in shortage. By seeing which components you’re missing, you’ll know which components you need to order before you can create the assembly. The report shows the following fields:

  • Component ID
  • Description
  • Quantity Needed
  • Quantity on Hand
  • Quantity Available


Item Sales by Customer and Purchase Order Number

This report displays item sales, sorted by customer purchase order number. This report was designed to provide an alternate method for looking up sales orders and invoices— sorted by the customer, then the customer purchase order number, and then by the sales order or invoice number. The report displays the following fields:

  • Customer ID
  • O. Number
  • Reference
  • Date
  • Description
  • Item Quantity
  • Item Subtotals


On Hand Detail Report   

This report displays detailed purchase information for inventory items that have a LIFO or FIFO costing method. The information in this report can be used to show how inventory has been valued. The On Hand Detail report displays the following fields:

  • Item ID
  • Item Description
  • Receipt Description
  • Reference
  • Receipt Date
  • Quantity
  • Unit Cost
  • Amount


Production Schedule

This report displays the assembly items on open sales orders, and is sorted by the Ship By Date. This report is designed to help you meet shipping deadlines by showing which assembly items need to be manufactured, and the order in which they need to be shipped. The report displays the following fields:

  • Ship By Date
  • Sales Order No
  • Customer ID
  • Customer Name
  • Item ID
  • Description


Stock Status by Location

Stock Status report, but includes the current quantities on sales orders and purchase orders in addition to the current quantity on hand. It also shows the history of the item (the quantity sold, received, and adjusted in the specified date range). The report displays the following fields:

  • Location
  • Item ID
  • Qty Received
  • Qty Sold
  • Qty Adjusted
  • Current Qty on PO
  • Current Qty on SO
  • Current Qty On Hand


If you would like to learn more about premium Crystal Reports in Sage 50 and Sage 50cloud, Accounting Business Solutions by JCS offers a Sage 50 Manufacturing/Sage 50cloud Manufacturing training class, as well as a Crystal Reports for Sage 50 class. For Sage 50 support and training, call us today at 800-475-1047 or email us at solutions@jcscomputer.com.
Sales Order Reports in Sage 100

Learn about Sales Order Reports in Sage 100 with Sage 100 training classes from Accounting Business Solutions by JCS!

Sales Order Reports in Sage 100

Sales Order Reports in Sage 100

Accounts Receivable Invoice History Report

  • Use the Accounts Receivable Invoice History Report to view a detailed listing of invoice information using Invoice Data Entry. If Sales Order or Job Cost is integrated with Accounts Receivable, you can also access invoice history information for invoices entered in these modules.
    • This report is only available if you selected Yes or Summary at the Retain in Detail field in Accounts Receivable Options.
  • Both Accounts Receivable and Sales Order invoices appear.
  • You can print a detailed listing of invoice information recorded in Invoice Data Entry.
  • Line item detail information is also provided for each invoice if you selected Yes at the Retain in Detail field in Accounts Receivable Options.

Invoice History Printing

  • Use the Invoice History Printing report to reprint multiple invoices after they are updated.
    • You can reprint invoices only if you selected Yes at the Retain in Detail field in Account Receivable Options.
  • You must print the different types of invoices separately.
  • You can choose to reprint only unpaid invoices for open item customers (for collection purposes).
  • Unlike Invoice History Inquiry, you can reprint more than one invoice at a time.

Accounts Receivable Trial Balance

  • Use the Accounts Receivable Trial Balance report to view a complete recap of the Accounts Receivable invoices.
  • The report details receipts and adjustments and other activities which affect Accounts Receivable balances.
    • This report is based on the posting date and it is the suggested report for reconciling to General Ledger.

Deposit Transaction Report

  • Use the Deposit Transaction Report to view a list of deposit payment transactions recorded in Sales Order. This report is available only if an option other than None is selected at the Retain Deposit Transaction History field in Accounts Receivable Options.
    • You have the option of including a range of payment types, customers, and transaction dates.
    • Information on the report includes the payment type, invoice number, date, and amount.
    • When the report is printed, you have the option of purging the data included on the report.

Monthly Sales Report

  • Use the Monthly Sales Report to produce a recap of sales activities for the period entered in Accounts Receivable. If using divisions, the report sorts by division.
    • You cannot change the period ending dates on this report.
  • You should print the report before closing the period.

Sales Analysis by Salesperson

  • Use the Sales Analysis by Salesperson report to produce a recap of: total sales, cost of goods sold, and profit percentages for each salesperson.
    • You can select which fiscal year and period to include on the report.
    • You can also determine if period to date, year to date, and prior year totals are provided for the period and year selected.
  • The information detailed in this report allows you to compare accounts receivable activity by salesperson and customer. You should print this report before closing the period.


Are you interested in learning about Sales Orders Reports  in Sage 100? Accounting Business Solutions by JCS offers Sage 100 training classes, including Sales Order Reports in Sage 100.  Call us today at 800-475-1047 or email us at solutions@jcscomputer.com today to get started.

Units of Measure (U/M) in Sage 50

How do you use units of measure in Sage 50? What are units of measure in Sage 50 used for?

The Maintain Units/Measures window allows you to set up new units/measures (U/M), other than the Stocking U/M, for purchasing or selling inventory items. In this window, you can set up new units/measures, change the ID for, and delete existing units/measures.

Note: You can access this window only if you have selected the option to Enable Multi-Packs and buying and selling items in different units/measures in the Inventory Item Defaults window.

If you purchase or sell items in bulk or in multi-pack units, create new units/measures to accommodate bulk sales or purchases. This saves you time because you won’t have to enter a new item for each unit/measure of an item that you buy or sell. By creating a new unit/measure based on the stocking unit, you can purchase and sell the multi-pack unit and the single units contained in the multi-pack.

You can set up as many units/measures as you need, but you can only assign two U/Ms to an inventory item: one for sales and one for purchases.


If you would like to learn more about Units of Measure in Sage 50 and Sage 50cloud, Accounting Business Solutions by JCS offers a Sage 50 Manufacturing/Sage 50cloud Manufacturing training class. For Sage 50 support and training, call us today at 800-475-1047 or email us at solutions@jcscomputer.com.
Item Multi-Packs in Sage 50

How do you use item multi-packs in Sage 50? What are item multi-packs in Sage 50 used for?

The Item Multi-Packs window allows you to assign additional units/measures to an inventory item, thereby creating a multi-pack. You can access this window by selecting the U/M button, which is located next to the Stocking U/M field in the Maintain Inventory Items window. In the Item Multi-Packs window, you can do the following:

  • change the Stocking U/M
  • allow items to be purchased or sold in a unit/measure other than the Stocking U/M, or multi-pack
  • assign a U/M, weight, and UPC/SCC code for multi-packs that you purchase
  • assign a U/M, weight, and UPC/SCC code for multi-packs that you sell

You can assign two units/measures in addition to the Stocking U/M to an inventory item: one for purchases and one for sales. When you purchase or sell items in units/measures that you have set up in Maintain Units/Measures, the subsequent item, when purchased or sold, is referred to as a multi-pack. Multi-Packs in Sage 50 are simply any inventory item that has been assigned a unit/measure other than the Stocking U/M. The resulting item, usually a box or a pack, contains more than one stocking unit of the inventory item.

Because you can only assign two units/measures to an inventory item, you should select the unit/measure in which you usually purchase or sell the item. For example if you buy in bulk but sell in single units, select the bulk unit in this window. After you have assigned purchasing and sales units/measures to an inventory item, you will be able to select the U/M for line items on the following windows: Quotes, Sales Orders, Sales/Invoicing, Receipts, Credit Memos, Select For Purchase Orders, Purchase Orders, Purchase/Receive Inventory, and Payments.


If you would like to learn more about Item Multi-Packs in Sage 50 and Sage 50cloud, Accounting Business Solutions by JCS offers a Sage 50 Manufacturing/Sage 50cloud Manufacturing training class. For Sage 50 support and training, call us today at 800-475-1047 or email us at solutions@jcscomputer.com.
Close Work Tickets in Sage 50

How do you close work tickets in Sage 50?

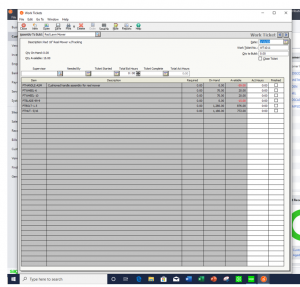
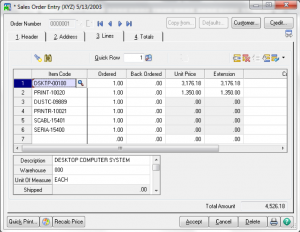
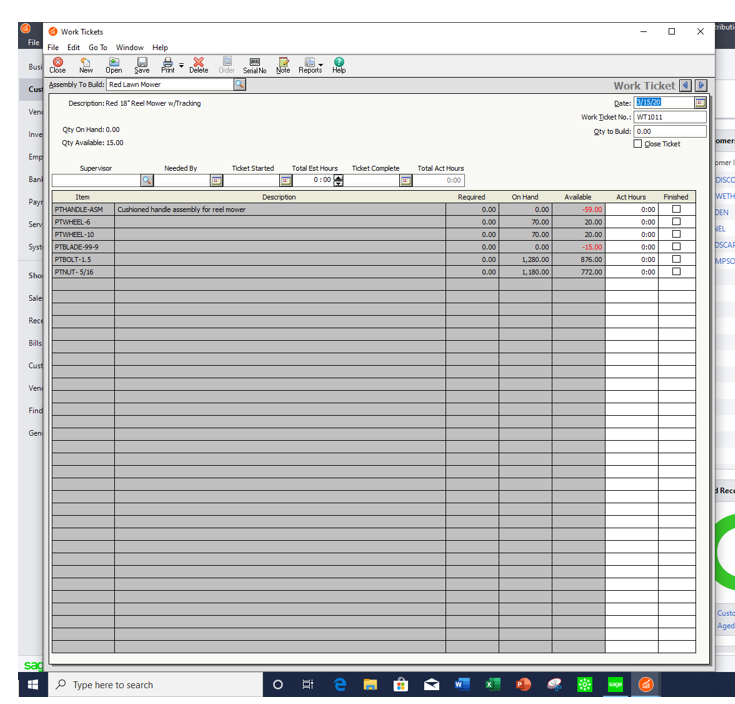
What are work tickets in Sage 50 closed for? When a work ticket is closed, an assembly build record is automatically created behind the scenes. Because the assembly build record is automatically created, you won’t have to build the assembly in the Build/Unbuild Assemblies window. To close a work ticket, follow the steps below.

  1. From the Tasks menu, select Work Tickets. The Work Tickets window appears.
  2. Click the Open button and select the number of the ticket that you want to close and click OK. The selected work ticket information appears in the Work Ticket window.
  3. To complete and close this work ticket, Enter or select 2/17/20  in the Ticket Completed box then select the Close Ticket checkbox. This selection will automatically complete and close the work ticket after, the ticket will be given a status of Closed.       
  4. After you have finished, select SaveWhen you save a closed work ticket, an assembly build record is automatically created behind the scenes. 

If you would like to learn more about how to close work tickets in Sage 50 and Sage 50cloud, Accounting Business Solutions by JCS offers a Sage 50 Manufacturing/Sage 50cloud Manufacturing training class. For Sage 50 support and training, call us today at 800-475-1047 or email us at solutions@jcscomputer.com.
Sales Order Entry in Sage 100

Learn about Sales Order Entry in Sage 100 in Sage 100 with Sage 100 training classes from Accounting Business Solutions by JCS!


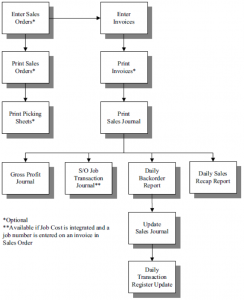
Entering Sales Orders

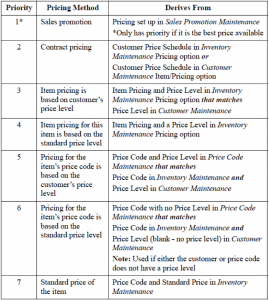
Pricing Hierarchy


Sales Orders Types

  • Standard Order
  • Master Order
  • Repeating Order
  • Price Quote
  • Back Order

Sales Orders Entry – Default Values

You can save default values for just the current Sales Order entry session or for future sessions as well. Values saved for future session are stored by user logon or workstation.


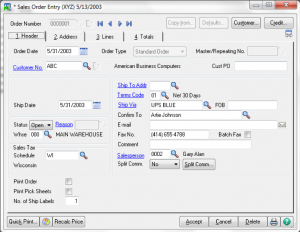
Sales Orders Entry – Header


  • Customer information comes from Accounts Receivable.
  • Order Type may not be changeable after entry on the Line tabe has taken place.
  • Order Status
    • New: This is the default status assigned to a Sales Order when entered. The status is automatically updated to the status of Open when it is printed.
    • Hold: When status is changed to Hold, the Reason field becomes available. You cannot print Sales Orders with the status of Hold until the status has been changed to Open.
    • Open: You can assign the status of Open at any time, whether the order is printed or not, but the status will change to Open automatically when it is printed.
  • Other Fields.
  • Commission Options.
  • If MAS is linked to Sage CRM, additional fields may appear.

Sales Orders Entry – Address

Sales Orders Entry – Lines

Only certain types of line item entries can be made.

  • Inventory Items
  • Sales Kits
  • Miscellaneous Items and Charge Codes
  • Comments
  • Special Items


  • Choose the Alias Item button to view alias item codes
  • Item Inquiries (item status, price lookups and alternates are available)
  • On-the-Fly Inventory items can be entered if allowed in Options.
  • Extended Descriptions button
  • items and comment codes are selected by using a forward slash (/) prefix.
  • Special Items are designated by an asterisk (*) prefix (can distribute sales and cost of sales directly to a GL acct, will drop ship automatically is set to do so in Options).
  • Sales Kit button
  • Customer Last Purchase
  • Secondary Grid fields
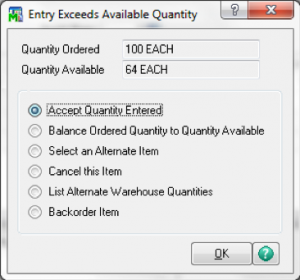
  • Exceeding Available Quantity Options


  • Available Quantities are automatically checked if told to in Options.
  • Accepting an exceeded quantity will over distribute resulting in a negative qty. available.
  • Quantity on Sales Order field in inventory is updated when the line entry is accepted.
  • Lines for Back Orders
    • Are generated automatically during normal processing whenever quantity shipped is less than quantity ordered
    • When entering manually, enter both quantity shipped and quantity ordered.


Sales Orders Entry – Totals


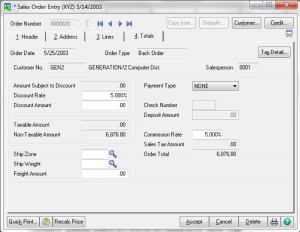
  • Amounts subject to tax are automatically calculated. View from Tax Detail button
  • Freight can be calculated based on ship code if selected in Options.
  • Deposits for complete payments may be entered. There however no posting for deposits or balance until order is invoiced.
    • Deposits reduce the amounts that get posted to the AR account, posting instead to customer deposits.
  • Selecting the CREDIT CARD payment type will result in a request for Credit Card information..
    • New authorization codes are required each time the deposit amount increases.

Sales Orders Entry – Other

  • Customer Data review or maintenance.
  • Customer Credit Checking
  • Quick Print
  • Copy From

Master Orders

  • ‘Blanket’ Order.
  • on SO field in Inventory is not updated when original Master Order is created.
  • New Standard Orders are issued against Master Orders for shipping and invoicing.
  • A cycle code may be assigned on the Master Order to use as selection criteria for automatic order generation by using Auto Generate Order Selection.
  • Cumulative quantities ordered and received are tracked on the Master Order.
  • Quantity remaining is defaulted for new order based on Master Orders.
  • Expiration (expired Master Orders are purged from Utilities)


Repeating Orders

  • Use as a template for routine standard orders.
  • All order data is stored with the order.
  • on SO field in Inventory is not updated when original Repeating Order is created.
  • Copy to Use or apply a standard order against.
  • A cycle code may be assigned on the Repeating Order to use as selection criteria for automatic order generation by using Auto Generate Order Selection.
  • Repeating Orders track last standard order date and number issued against it.
  • Original order quantity is defaulted for new order based on Repeating Order.
  • Expiration (expired Repeating Orders purge automatically during period end processing or can be manually purged from Utilities)

Automatically Generate Sales Orders

  • For Master or Repeating Orders.
  • Expired or on hold orders may be optionally selected.
  • Selected orders are not generated until the Listing is printed and updated.

Price Quotes

  • Customers may be added On-the-Fly.
  • Item pricing, discounts, freight, and other calculations take place just as they would on a Sales Order.
  • Quantity on hand checking is performed, but nothing is updated inventory.
  • Can be printed individually or in groups.
  • Can be easily converted to a Sales Order.

Printing Sales Orders

Printing Picking Sheets

  • Picking sheets for orders with drop ship or back order items cannot be printed.
  • Picking sheets can be reprinted.
  • If activated, Bill of Material bill options can also be printed.
  • Use Clear to remove previous selections.

Printing Shipping Labels

Entering Customer Deposits

  • Cash Receipts Entry in Accounts Receivable is used to record the receipt of either a deposit (prepayment) or payments against outstanding customer balances.
  • Deposits by cash, check or credit card are enterd in C ash Receipts Entry.
  • Only record credit card deposits when you want to recognize cash at the time of the order.

Daily Drop Ship Report

  • Only items designated as drop ship will appear on this report.
  • Report is sorted by Vendor and Item Number with totals for each.
  • Information can be optionally cleared after printing.
  • The Daily Drop Ship file can be cleared at any time.


Are you interested in learning about Sales Order Entry  in Sage 100? Accounting Business Solutions by JCS offers Sage 100 training classes, including Sales Order Entry in Sage 100.  Call us today at 800-475-1047 or email us at solutions@jcscomputer.com today to get started.

Print Work Tickets in Sage 50 and Sage 50cloud

How do you print work tickets in Sage 50? What are work tickets in Sage 50 used for?

Work tickets can be printed and used in various ways. Printed work tickets may be used in your Inventory department to gather the materials needed to build an assembly. Likewise, copies of closed work tickets may be sent along with the necessary materials to authorize the shop to build an assembly.

In Sage 50, you can print work tickets in two ways:

  1. By clicking the Print button in the Work Tickets window
  2. By selecting Work Tickets from the Inventory Report List in the Select a Report window

If you are interested in printing just one work ticket and you already have the Work Tickets window open, print the ticket by selecting the Print button. However, if you are interested in printing a number of work tickets, print the work tickets from the Inventory Report List in the Select a Report window. Use the following procedure to print work tickets in the Select a Report window.

If you would like to learn more about how to print work tickets in Sage 50 and Sage 50cloud, Accounting Business Solutions by JCS offers a Sage 50 Manufacturing/Sage 50cloud Manufacturing training class. For Sage 50 support and training, call us today at 800-475-1047 or email us at solutions@jcscomputer.com.
Sage 50 Bill of Materials for inventory management of Sage 50

Sage 50 Bill of Materials Revisions

Bill of Materials Revisions in Sage 50

Revisions allow you to make changes to the bill of materials for assembly items that have been used in transactions. You can access the Revisions window by selecting the Revisions button, which is located on the Bill of Material tab of the Maintain Inventory Items window. The Revisions window lists all revisions that have been made to the bill of materials and the effective date for the revision. From this window, you can either create a new or edit an existing revision. The original bill of materials is always listed as Revision 0 and cannot be deleted.

Sage 50 Bill of Materials for inventory management of Sage 50

Updates

Bill of Material – Revisions are valuable because they update the bill of materials without altering the original bill of materials. Any item built before the new revision date will be associated with the current assembly build. Revisions allow you to make slight changes to the bill of materials without requiring you to create a new Sage 50 inventory assembly.

Although you can use them in a number of ways, revisions are only intended to be used to make minor changes to the bill of materials. To help clarify what constitutes a minor change and to further explain when to use a revision as opposed to another assembly item, consider the following examples:

Sage 50 Bill of Material – Revision vs New

  • When to create a revision: You produce large quantities of an item and occasionally the options for that item change mid-stream. Let’s say that the screw that you are using for the item is no longer available or you want to use a different screw.  By replacing this component only in the bill of materials, you create a revision. This allows you to produce an assembly item that may differ slightly, but is treated identically for inventory purposes.
  • When to create a new assembly item: You produce large quantities of an item and occasionally the options for the item change mid-stream. Let’s say that one of the components for the item has tripled in price.In this case, we recommend that you create a new assembly item instead of a revision. You should create a new assembly item when costs greatly increase or components change significantly.

Changes to the bill of materials are entered on either the Create a New Revision or on the Edit an Existing Revision window. This is dependant upon whether you selected the New or Edit button in the Revisions window.

Modifications

In this window, you can add and delete items, move items up or down on the component list. In addition, you cab change the quantity required. While you have a great deal of flexibility in what you can change. However, it is important to remember that revisions should only be used to make minor changes to the bill of materials.

When entering a revision, a ‘revision number’ is assigned to the revision and will be listed in the window. For reports that list the bill of materials, the corresponding revision number will also be listed on the report.This will help you keep track of which items should be included in the bill of materials.

Two other very important parts of a revision are the Effective Date and the Note. The effective date is important because it determines when a revision will be used by Sage 50 to build or un-build assemblies. Likewise, a note helps you identify the purpose of a revision. If a note is not entered, Sage 50 will automatically insert a generic note. This note includes the date, time, and the Sage 50 user who entered the revision.

To learn more about Bill-of-Material Revisions in Sage 50 and Sage 100, Accounting Business Solutions by JCS offers training classes. Both a Sage 50 Manufacturing and Sage 50 Inventory Management training classes. For Sage 50 support and training, call us today at 800-475-1047 or visit us www.jcscomputer.com.

Quantity Discounts in Sage 50

How do you use Quantity Discounts in Sage 50? What are Quantity Discounts in Sage 50 used for?

The Maintain Quantity Discounts window allows you to set up discounts for items based upon the quantity sold. You can set up your inventory so that when a customer purchases a specified amount of an item, its sales price is discounted by a percentage or a set amount. For example, you could give customers a 10% discount if they purchase 50 or more of a certain inventory item.

When you set up a quantity discount, you can specify up to five different quantity ranges and corresponding discounts. For example, you could create a quantity discount that gives a 5% discount if 25 or more widgets are purchased, 10% if 50 or more widgets are purchased, 20% if 100 or more widgets are purchased (and so forth), until you’ve created as many quantity discounts as you need. You can create a unique quantity discount ID for each item in your inventory, or create one quantity discount and apply it to whichever inventory items you choose. For example, you could create a discount for a seasonal sale and apply the discount to your seasonal inventory items. You could also create a separate discount specifically for lawn mowers. Quantity discounts are available for stock, master stock, non-stock, service, labor, and assembly item classes.

After you set up the quantity discounts and apply them to inventory items, the sales prices will be automatically discounted on quotes, sales orders, sales invoices, receipts, credit memos (Apply to Sales tab), memorized quotes, and memorized invoices.

Note:Quantity discounts are calculated separately for each line of a transaction. If you create a quantity discount where purchasing 40 widgets discounts the widgets by 5%, all 40 widgets must be entered on the same line in order for the discount to be calculated.

When you sell items in multi-pack units, Peachtree checks to see whether the number of units in the multi-pack meets the criteria for a quantity discount. For example, if you create a quantity discount where selling six items gives customers a discount, selling one six-pack of the item (a multi-pack unit that you created) would be treated the same as six individual units. The customer will receive the quantity discount.

If you would like to learn more about Quantity Discounts in Sage 50 and Sage 50cloud, Accounting Business Solutions by JCS offers a Sage 50 Manufacturing/Sage 50cloud Manufacturing training class. For Sage 50 support and training, call us today at 800-475-1047 or email us at solutions@jcscomputer.com.
Sales Order Inquiries in Sage 100

Learn about Sales Order Inquiries in Sage 100 with Sage 100 training classes from Accounting Business Solutions by JCS!

Sales Order Inquiries in Sage 100

Invoice History Inquiry

  • Use Invoice History Inquiry to view and reprint previously updated invoices.
    • Information is displayed by invoice and you cannot modify the information.
    • You can only reprint invoices if you selected Yes at the Retain in Detail field in Accounts Receivable Options.
  • If you selected Summary at this field, you can access only invoice header information and you cannot reprint invoices.
  • Inquire on a delivery status using the tracking information
    • Note: This task is also available on the Accounts Receivable Main menu.

Inventory Inquiry

  • Use Inventory Inquiry to review information for a specific inventory item.
    • You can access item information without the ability to make changes.
    • Uses the same tabs of information accessible in Inventory Maintenance.
      • This task is only available if Sales Order is integrated with Inventory Management.
      • Note: This task is also available on the Inventory Management Main menu.

Sales Order/Quote History Inquiry

  • Use Sales Order/Quote History Inquiry to view all information for sales orders and quotes.
    • View quote information if the invoice is created using the original quote generated.
    • View deleted sales orders, quotes, and line items if you selected to retain deleted sales orders, quotes, and line items in Sales Order Options.
      • If retaining deleted orders, quotes, or lines using the Prompt option, you can also view the cancellation codes.

RMA Inquiry

  • Use RMA Inquiry to view all return merchandise authorizations created in RMA Data Entry and RMA Receipts Entry.
    • You can inquire on an invoice or a customer for the selected RMA
    • You can view the customer credit history information by clicking Credit.

Shipping History Inquiry

  • Use Shipping History Inquiry on the Shipping menu to view shipments entered in Shipping Data Entry and updated during the Sales Journal update.
    • This task is available only if the Enable Shipping check box is selected in Sales Order Options and if Yes or Summary is selected at the Retain in Detail field in Accounts Receivable Setup Options
  • You can access the Lines tab only if Yes is selected at the Retain in Detail field in Accounts Receivable Options
    • Note: Shipping history information is stored in Accounts Receivable.

Are you interested in learning about Sales Orders Inquiries  in Sage 100? Accounting Business Solutions by JCS offers Sage 100 training classes, including Sales Order Inquiries in Sage 100.  Call us today at 800-475-1047 or email us at solutions@jcscomputer.com today to get started.

X